
Creating a Table
When creating a table, you need to specify a number of rows and columns. A row is a horizontal series of cells, while a column is a vertical series.
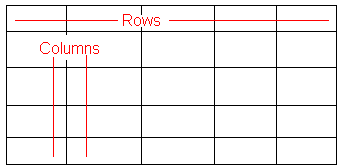
If you know how many rows and columns the table will be, enter those numbers. If you don’t know the exact number when you create the table, estimate how many you need. You can easily add or remove rows and columns later.
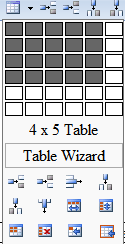
There are two ways to create a table. If your table will be six rows by six columns or less, use the Table Builder. See Also: Creating a Table Using the Table BuilderTo create a table, follow these steps.1. Click Table ().2. Drag the cursor over rows and column to indicate the size of the table.The following example shows a table that is 4 rows by 5 columns.3. Click the mouse.At this point, the table looks like this.4. Begin entering text and images into the table cells. To further modify the table, see Modifying Table Properties.You can also select the table and drag its right border to the right and/or down to enlarge it for ease of use.
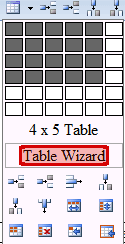
If it will exceed 6 x 6, use the Table Wizard. See Also: Creating a Table Using the Table Wizard1. Click Table ().2. Click Table Wizard (circled below).3. The Table Wizard dialog appears.4. To change the number of columns or rows, click the plus or minus signs (+ -) next to Columns and Rows.5. The image adjusts to show the number of rows and columns.6. Press OK.7. Begin entering text and images into the table cells. To further modify the table, see Modifying Table Properties.
Either way, once the table is created, you use the features described in Modifying Table Properties to add borders, background color, set width and height, etc.
To create a table, follow these steps.
1. Click Table (
2. Drag the cursor over rows and column to indicate the size of the table.
The following example shows a table that is 4 rows by 5 columns.
3. Click the mouse.
At this point, the table looks like this.
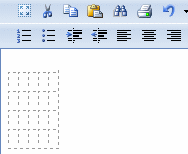
4. Begin entering text and images into the table cells. To further modify the table, see Modifying Table Properties.
You can also select the table and drag its right border to the right and/or down to enlarge it for ease of use.
1. Click Table (
2. Click Table Wizard (circled below).
3. The Table Wizard dialog appears.
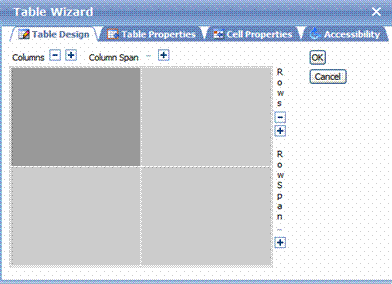
4. To change the number of columns or rows, click the plus or minus signs (+ -) next to Columns and Rows.
5. The image adjusts to show the number of rows and columns.
6. Press OK.
7. Begin entering text and images into the table cells. To further modify the table, see Modifying Table Properties.


